Time for an update on the KMS-PR-MK1
Previously we left off with the lower receiver being sent off for engraving.
WARNING NEVER SEND A COMPLETELY MILLED RECEIVER THROUGH THE MAIL! ONCE A RECEIVER IS MILLED IT IS CONSIDERED A FIREARM AND MUST BE TRANSFERRED VIA FFL DEALER. IF you plan on sending it out for engraving, leave it as an 80% uncompleted paperweight.
We actually got it back pretty quick this go around. I went ahead and sent it off to www.CustomARDustCovers.com since we were ordering other items from there. They are out in PA and had the part back to us within 2 weeks which I feel is fortunate.
As seen in my other How-to linked here: https://www.kielermilitiasupply.com/p/how-to-machine-80-ar15-lower.html
The link above will list tools purchased and used. My Jig is set up to do both AR-10 & AR15 lower receivers. The link above will also show how the inlay work was done.
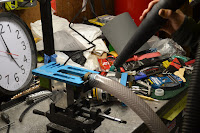
Next is to tape off the receiver and assemble the jig around the receiver in preparation for milling.
If you bought the pro jig it comes with different end pieces for the AR10 vs AR15
I always recommend you tape things up before assembly. I use the Green Frogtape.
Also, before you begin milling you better have some safety glasses and/or face shield. Your router is being equipped with an endmill bit that is spinning at several thousand RPMs at any given point and you are cutting aluminum, so unless you want an unplanned hospital visit for the metal in your eyes you better wear safety equipment to protect yourself. You may also want to think about hearing protection as well.
Once you're all jigged up you will need to drill your pilot hole. This is where you will start the milling bit at each pass. You will take this process step by step.
Instruction will say use WD-40, but if you have some cutting oil on hand I would use that for drilling.
Now if you have one of the larger tubed shop vacs, you will want to make yourself one of these attachments. Refer to the link above for materials sourced for adapting your jig to the shop vac. This Significantly cuts down some of the mess as you run the milling process with your router.
Content Creator and Army Veteran
NOTE: TO PREVENT DAMAGE ALWAYS MAKE SURE THAT YOUR ROUTER HAS COME TO A COMPLETE STOP BEFORE PULLING OUT OR PUTTING IN THE PILOT HOLE.
Too many times I have heard of people getting into a rush during this process and catching the side of your receiver can be catastrophic and dangerous if that router still has the bit moving.
After reaching each level of milling you will need to change the router guide pegs to the next level longer pegs.
here installing the next set of guide pegs
Here I am readjusting the depth for another pass.
Here I'm putting out how the milling replicates the cut on the top plate. If a person wanted to make a full auto receiver they would have to mill this top plate with an endmill. It is illegal to make a full auto AR without proper licensing and paperwork.
Here I am pointing out the tick marks. Each pass you make you will adjust the router depth from one mark to the next till you hit the end of the milled-out area here on the plate. Be sure to go past the tick mark and bottom out to the number 2 section or you will have issues with the trigger working.
Here I am moving to step 3 in the milling process.
Here I am swapping out the pegs to the longest one for fia nal pass which is the trigger hole at the bottom.
Here I am setting the depth for the final pass.
Here we are starting as you have throughout this in the pilot hole.
Next step we are going to drill our safety switch hole and our trigger pinholes.
Ths is the point where I used cutting oil spray. It sticks and lubes better for drilling.
AT this point we have only finished the milling part and this takes a while to do it right and it takes longer than 30 Minutes unlike what politicians have said. The only way to do it really fast is to have a Ghost Gunner CNC machine which most people are not going to splurge for. Especially your common criminals.
I feel it is my duty to correct politician lies.
Ghost Gunner 2 took 4 hours to mill the receiver
Ghost Gunner 3 still takes over 30 min to mill the receiver


No comments:
Post a Comment