KMS-PR-MK1--AR10-Barrel Feed Ramp Polishing and Upper Receiver Work
The starting point. Wilson Combat Super Sniper Barrel in .308 Caliber. To keep debris out of your barrel plug it up. You don't want material going down your barrel. As always wear eye protection when working with power tools or anytime there is potential for flying debris.
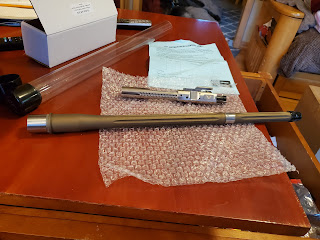


Some tools and materials are needed. I use a Dremel and various buffing compounds and various buffing bits. I found this set shown below on Amazon. Again no one locally had something like this.


Here you can see the barrel held in my vice with my homemade soft jaws. Two pieces of plywood with magnetic tape to hold them to the vice works great, especially when you can't find someone locally carrying soft jaws and have scrap lying around. These compound blocks I had bought years ago from a truck stop.

Pretty basic stuff here you start with the roughest compound and work your way to the finishing compound. GoalThe goal is to get it to a polished mirror and remove all factory machining marks making the feed ramp as smooth and slick as possible without changing the angles.


Your end result should look like above and all rough edges your cartridge will ride should be smooth and polished as seen here. We don't want the cartridge to drag or hang up.
Upper receiver assembly and my trick to get the forward assist installed.
Now installing the dust cover isn't that complicated, it's all about aligning that spring as you feed the mounting rod through. Now if you wanted to go custom on the dust cover, this is the time to do it. Changing the dust cover at a later point would require the removal of the barrel. Now for instructional use, I have installed the standard dust cover, however, it was later decided that I will be putting another laser engraved dust cover on here with the 2nd Amendment. It's still in the mail. ,


Orientation of spring for the Dust Cover is shown here.


Next prepping upper for the installing the forward assist.
This will require installing the forward assist button, the spring, and the retaining roll pin.
You'll want to mount it in the vice so having an upper vice mount is handy.


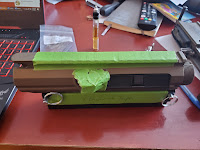
had some play in the mount so I added some layers of tape. 5 on each side

Anywhere you know you will be swinging a hammer and working with a punch you should tape to be safe just you bounce off the target, so I thoroughly tape the receiver off in case

My little trick to hold that forward assist in with that spring in place as I hammer that retaining roll pin is to use a couple of zip ties.


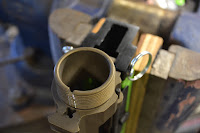
Another step you want to take on the upper is lapping the face of the receiver to true it up.
You can do this with Lapping compound 220 grit and a specially designed lapping tool that feeds down the throat of the receiver. You apply compound to the surface that mates up with the tool and you only need to take off enough to true it up. This helps with accuracy by allowing the barrel to mate up with the surface of the receiver evenly.


Beginning point


End Point


No comments:
Post a Comment